 FLIP
FLIP 10 Common Flip 7 Mistakes
The habits that quietly cost new players the most games — and how to break them.
Flip 7 is easy to learn and hard to master, and most losing games come down to the same handful of avoidable errors. These aren't exotic edge cases — they're the patterns that show up game after game when you watch how people actually play, and every one of them has a concrete fix you can apply on your very next round. Fix these ten and you'll win noticeably more; for the theory behind the fixes, the Strategy guide and Odds guide go deeper on each.
Playing it safe too early
With only one or two cards in your row, your chance of busting on the next hit is tiny — hold a single 7, and only the six remaining 7s among ninety-odd cards can hurt you, roughly a 7% risk. Yet new players routinely stay on rows worth 8 or 10 points, "locking in" almost nothing. The problem is pace: winning games typically requires averaging 25–35 points a round, and a banked 8 doesn't just underperform — it burns a whole round getting there.
Fix: hit without hesitation on your first two or three cards. The risk is genuinely low, and a round that starts timid almost never recovers. The only time a tiny bank is correct is when a tiny bank wins the game — at 195 points, take your 5 and go home.
Counting cards, not risk
New players think "I have four cards, that feels like enough." But card count is a terrible proxy for danger. Compare two rows: holding 0, 1, 2 and 3, only three cards in the whole deck can bust you (the one spare 2 and the two spare 3s — the 0 and 1 have no copies at all). Holding just 11 and 12, twenty-one cards can end your round. The four-card row is seven times safer than the two-card row.
Fix: before every hit, glance at which numbers you hold, not how many. High numbers carry their risk with them; low numbers are nearly free. The odds guide turns this into exact percentages, and the in-game bust-risk meter does the arithmetic for you live.
Forgetting that 0 and 1 are free
The 0 and the 1 are the only single-copy numbers in the deck, so once one is in your row it can never bust you — there is literally no second copy to draw. Players groan when they flip the 0 ("zero points!") and treat the 1 as barely better. But look at what the 0 actually is: a permanent, risk-free step toward the seven unique numbers that trigger the +15 Flip 7 bonus. A row of 0, 1, 2, 5, 8 is five-sevenths of the way to the bonus while carrying the bust profile of a three-card hand.
Fix: re-price the low cards in your head. The 0 is not a blank — it's a free Flip 7 slot. When your row contains a 0 or 1, your true risk is lower than the row looks, so push a little further than you otherwise would.
Wasting Second Chance on a thin hand
Second Chance cancels exactly one bust, and its value is exactly the points it saves. Burn it surviving a two-card row and it protected maybe 10 points; hold it until you're sitting on six unique numbers with a multiplier down and it can protect 60 or more. Since you can't choose when it triggers — it fires automatically on your next duplicate — the real decision is when you keep hitting while you hold one.
Fix: treat Second Chance as a licence to push a big row, not as a reason to gamble a small one. With insurance in front of you and five or six uniques, the Flip 7 chase becomes close to free — that's the moment the card was made for. And remember it survives only one duplicate: after it fires, your very next hit is naked again.
Never chasing the Flip 7 bonus
At six unique numbers, one more card means Flip 7 — an instant +15 on top of your round total, and often the single biggest swing available in the game. Timid players stop at six every time, reasoning that the row is already valuable. But run the trade honestly: the hit that completes a Flip 7 doesn't just add +15 — it also adds the drawn card's own points, and both land on top of whatever you've built. Against that, a six-unique row typically busts on somewhere between a quarter and a third of draws.
Fix: at six uniques, lean toward the hit — the maths is usually favourable, and with a Second Chance in hand it's not even close. The exception is the endgame: if banking your six-card row wins the game outright, take the win and let the bonus go.
Grabbing the ×2 and then stopping
The ×2 multiplier is only worth as much as the total it doubles. Draw it onto a 10-point row and stay immediately, and the game's rarest card — there is exactly one in the deck — earned you ten points. The multiplier changes the value of every card you draw after it: each number is worth double, and the flat bonuses double too, so a +10 becomes twenty points.
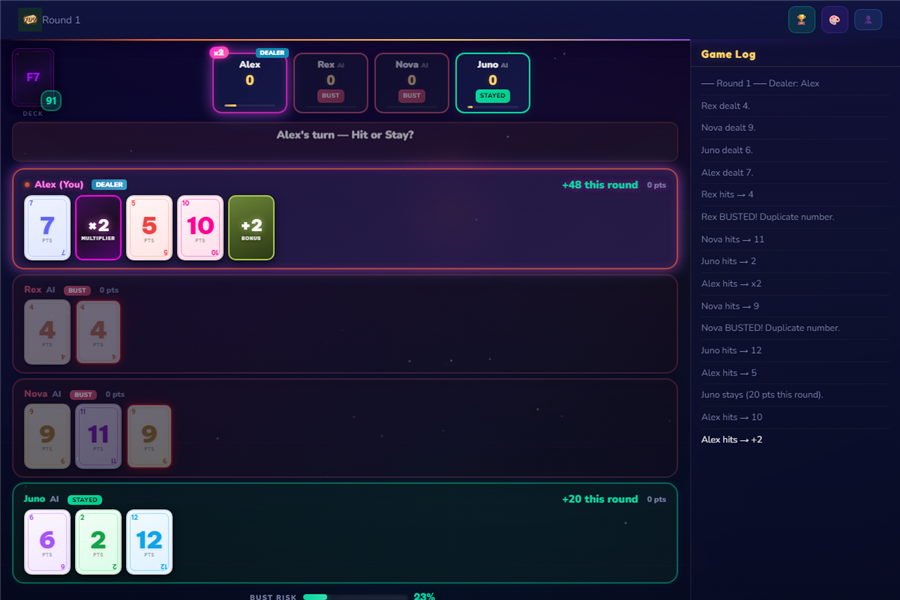
Fix: when the ×2 lands, shift gears and build. Every point you add is worth two, which roughly doubles the risk you should be willing to take. Stay only when the doubled total is genuinely large or the bust meter gets ugly.
Freezing the wrong opponent
Freeze only ever targets an opponent — you can't freeze yourself — so its whole value is in who you stop and when. Here's the subtlety new players miss: freezing someone forces them to bank what they have, not lose it. Freeze a player with two cards and you've handed them a safe exit they'd have taken anyway. Freeze the leader the turn after they've built a 30-point row and you've… given them 30 points. The real damage is denying what they would have gone on to build — the Flip 7 chase, the multiplied row.
Fix: aim Freeze at the player whose round threatens you most, at the moment their ambitions are biggest — a leader mid-build with a multiplier down, or anyone about to cross 200. You're not stealing their points; you're capping them.
Aiming Flip Three at the wrong player
Flip Three forces its target to draw three cards in a row, resolving each one normally — and its danger scales violently with how crowded the target's row already is. Aim it at a fresh row and you've gifted an opponent three free cards; there's a real chance you just dealt them most of a Flip 7. Aim it at someone holding six unique numbers and each of those three forced draws rolls the dice on their whole round — the compound odds of surviving all three are poor.
Fix: Flip Three is a weapon against full rows and a present for empty ones. Target the opponent with the most uniques on the table. And when your own row is one or two cards, pointing it at yourself is a legitimate, aggressive play — three fast cards at minimal risk.
Ignoring the score gap
Playing every round the same way regardless of the scoreboard is one of the most common — and most invisible — leaks. Flip 7 isn't a fixed-odds puzzle; the correct risk level depends entirely on the race. At 180 points against a field on 120, a modest banked 20 wins you the game, and every extra hit risks handing the round to someone who needs miracles. At 120 chasing a leader on 180, "safe" play is actually the losing line — banking 15 a round while they bank 20 just loses slowly.
Fix: check the totals before every round and pick a posture. Leading: bank early, deny drama, and hold action cards to police the chasers. Trailing: chase the Flip 7, ride the ×2, and aim your Freeze and Flip Three at the leader. Variance is the trailing player's best friend and the leader's enemy.
Not watching the high cards leave
Every 10, 11, or 12 that has already hit the table — in anyone's row, or in a bust — is one fewer copy that can duplicate yours. Twelve 12s sound terrifying, but if five of them are already visible, your own 12 is suddenly closer in danger to a 7. Most players never adjust: they price their high cards at full menace all deck long, staying early on rows that were actually fine to push.
Fix: keep a loose count of the high numbers you've seen this deck, and let it soften (or sharpen) your read on your own row. Two caveats: a reshuffle wipes the count completely — everything is live again — and in this browser version the bust-risk meter already accounts for every card that's left, so the skill here is learning to trust the number instead of your gut.
Master these and you're playing well above the average table. For the deeper theory, read the Strategy & FAQ and Odds & Probability guides — and if you want to see how different playstyles make these mistakes (or don't), the Know Your Opponents guide profiles the eight AI personalities you'll face in solo play.
Ready to stop making them?
One game takes about 5 minutes. No download, no account required.
▶ Play Flip 7 Free